Thermal bridges around the roof are one of the most common issues affecting a building’s energy efficiency. They most often occur where the thermal insulation is interrupted—at the junction of the roof and exterior walls, near the roof plate, roof windows, chimneys, and the eaves. Even minor design or construction errors can lead to heat loss, higher heating costs, localized cooling of building components, and the risk of moisture damage.
Proper design and construction of the joints between the roof and the walls help reduce heat loss, increase the durability of the entire building envelope, and maintain a comfortable indoor temperature year-round. For this reason, it is important to incorporate solutions that minimize the risk of thermal bridges as early as the construction phase. Understanding where thermal bridges occur and how to eliminate them helps avoid costly construction errors and improves the building’s energy efficiency.

In this post, you’ll learn about the most common problems:
The “Roofs in Practice” series is a technical compendium of knowledge on the construction and maintenance of metal roofs. The articles cover a wide range of topics—from solid structural foundations, through the physics of materials and moisture management, to informed decisions regarding aesthetics and quality. The series organizes knowledge about how a roof really works: why the roof framing determines the durability of the roofing, how sheet metal reacts to temperature changes, and where condensation comes from. A key element is understanding materials—the guide teaches readers to distinguish between nonwoven fabric and membranes, interpret laboratory test results, and make informed assessments of structural solutions, such as a roof without eaves. Together, this forms a guide that enables you to build and renovate a roof based on technical knowledge, proven materials, and informed choices at every stage of the project.
In this article, you’ll learn what thermal bridges around the roof are and why they have such a significant impact on a building’s energy efficiency. We explain where they most commonly occur, including at the junction of the roof and exterior walls, around the roof plate, roof windows, chimneys, utility penetrations, and the eaves. You’ll also learn how to recognize the signs of thermal bridges, why they can lead to heat loss, moisture buildup, and mold growth, and how to reduce the risk of their formation by maintaining the continuity of insulation, carefully installing connections, and ensuring quality control of the work.
Thermal bridges are areas in a building envelope through which heat transfers much faster than through the rest of the envelope. Thermal bridges occur in a home’s structure in places where thermal insulation is interrupted or weakened, where materials with high thermal conductivity are used, or where elements with different thermal conductivities are joined together.
The main types of thermal bridges include linear thermal bridges and point thermal bridges. Linear thermal bridges form along the joints of structural elements, while point thermal bridges occur at specific attachment points, such as mechanical fasteners or anchoring elements.
The roof area is particularly prone to the formation of such gaps. This is because there are many joints within this area—between the roof surface, exterior walls, chimneys, dormers, and elements around roof windows. Each of these junctions requires the thermal insulation to remain continuous, because even a slight break in the thermal insulation layer or errors made during the installation of roof insulation can lead to increased heat loss. An additional risk is the formation of gaps, which further reduce the insulation performance of the entire roof assembly.
The greatest risk occurs at the joints between different structural elements and where the insulation is interrupted. These are critical areas where even minor installation errors can lead to significant heat loss, a reduction in the partition’s insulation performance, and increased heating costs. Where do thermal bridges most commonly occur?
One of the most critical areas is where the exterior wall meets the roof. In this area, it is particularly important to maintain the continuity of the thermal insulation between the wall and the roof. If the thermal insulation is interrupted during the installation process, it results in a local weakening of the building envelope. This problem applies to all construction methods—including both single-layer walls and partitions with additional layers of insulation, whether built from aerated concrete, ceramics, or silicate materials—if the continuity of the thermal insulation is not maintained during construction.
The wall plate is responsible for transferring loads from the roof framing to the building’s walls, which is why proper insulation of this element is crucial. A break in the insulation around this element promotes the formation of thermal bridges, which reduce the insulation performance of the entire connection. Maintaining continuity of the insulation between the wall insulation and the roof structure effectively reduces the risk of heat loss.
Roof windows are particularly vulnerable. Errors made during assembly, improper warm assembly, insufficient insulation material around the window frame, or a lack of a tight seal with the roof layers all contribute to thermal bridges forming very easily. As a result, cold spots may appear around roof windows, and during the winter, water vapor may condense, indicating localized cooling of the building envelope.
Chimneys, ventilation ducts, and other elements that pass through the roof require very careful installation. Any break in the thermal insulation increases the risk of thermal bridges, which is why it is particularly important to precisely fit the insulation material and ensure that the joints around all roof penetrations are completely airtight.
Problems also frequently occur around the eaves and at the edge of the roof slope. If the insulation layers are not properly connected to the wall insulation, localized cooling of the building’s exterior envelope occurs.
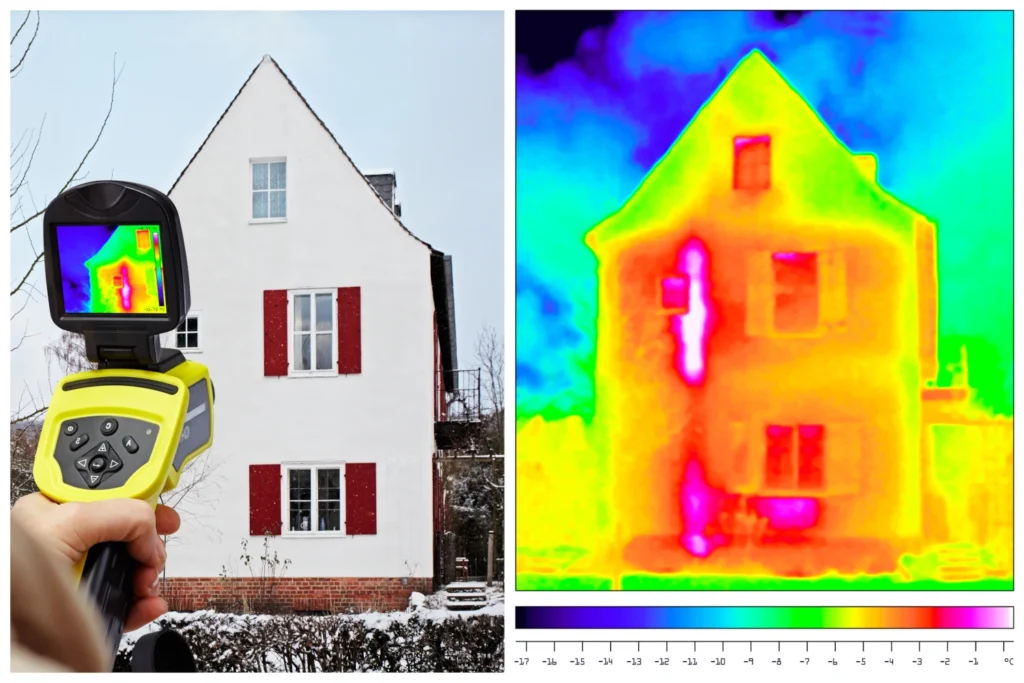
Thermal bridges are most often identified by their effects rather than by their exact locations. Characteristic signs include cold spots on walls or sloped surfaces, moisture on the finish, and traces of water vapor condensation. If the problem persists for an extended period, the moisture promotes the growth of mold and fungi, indicating a deterioration in the thermal performance of the building envelope.
Their presence may also be indicated by higher heating costs and noticeably cooler spots near roof windows, at the junction of the walls and the roof, or around the chimney. In these areas, the surface temperature of the building envelope is lower than in other parts, which contributes to the cooling of the rooms and increases heat loss.
The most effective methods for detecting linear and point thermal bridges involve thermal imaging inspections conducted during the heating season. This allows for the precise identification of areas with the greatest energy losses and an assessment of the scale of the problem. The next step should be to eliminate thermal bridges, which will help reduce further energy loss and prevent damage to the building envelope. It’s worth remembering that similar problems aren’t limited to the roof. Thermal bridges near windows, balconies, foundation walls, or basement walls can also compromise a building’s insulation, so the inspection should cover all exterior walls.
Most problems do not result from the use of inappropriate materials, but from mistakes made during the insulation installation process. Even minor inaccuracies can lead to reduced insulation performance, increased heat loss, and premature moisture damage to structural elements.
One of the most common mistakes is a lack of continuity in the exterior thermal insulation. Even small gaps between insulation boards or gaps that haven’t been properly filled create areas through which heat escapes much faster than through the rest of the wall.
Improperly assembled thermal insulation, leaving gaps around roof windows, or careless placement of insulation material can lead to the window reveals becoming cold. As a result, localized thermal bridges form, which over time can lead to moisture buildup, mold growth, and a decrease in the thermal comfort of the rooms.
The roof edge is one of the most challenging areas in terms of installation. If the insulation material is not precisely fitted to the roof structure, gaps are likely to form. Even small gaps can significantly reduce the effectiveness of the insulation.
The proper selection of insulation materials is also crucial. When insulating a roof, one should choose materials with appropriate thermal properties, tailored to the design and construction method of the roof structure. In practice, mineral wool works very well because it fills the spaces between the rafters completely and conforms well to their shape. However, its effectiveness depends on careful assembly, proper cutting, the absence of voids, and protection against moisture. In some applications, sprayed polyurethane foam or extruded polystyrene is also used, if required by the design specifications.
Improperly installed insulation, materials that aren’t cut precisely, or leaving gaps can cause thermal bridges to form even during the roof construction phase. In such cases, it is much more difficult to eliminate thermal bridges later on, and removing them often requires costly repair work.
The elimination of thermal bridges should begin as early as the design phase, since subsequent repairs are significantly more costly and require modifications to the completed structure. Properly selected materials, careful execution of all joints, and adequate supervision of the work help prevent heat loss and maintain the building’s high energy efficiency.
The basic principle is to maintain a continuous layer of insulation across the entire roof surface. There should be no gaps or incompletely filled areas in the thermal insulation layer. Insulation materials must fit snugly against the structural elements, as only then can they effectively limit heat transfer and help prevent thermal bridges.
The airtightness of the roof assembly is also very important. A properly installed vapor barrier on the interior side limits moisture penetration into the roof layers and reduces the risk of water vapor condensation within the roof assembly. Even well-chosen insulation material will not function properly if it is installed carelessly, if gaps remain, or if the joints are not properly sealed.
Professional, proper assembly of roof windows is extremely important. The use of specialized insulation flanges and sealing tapes, along with careful execution of all joints, helps prevent thermal bridges around the windows and reduces the risk of moisture penetration into the building envelope.
When insulating a roof, choose materials that have low thermal conductivity and retain their properties for many years. Mineral wool provides excellent results because it thoroughly fills the spaces between the rafters, conforms well to their shape, and reduces the risk of air pockets forming.
Special attention should be paid to the junctions between the roof and the walls, chimneys, and roof windows. Proper sealing of these junctions limits the penetration of air and moisture, reducing the risk of localized cooling and the formation of thermal bridges.
Once the work is complete, it is advisable to conduct a thermal imaging inspection to assess the effectiveness of the solutions implemented. Early detection of irregularities allows thermal bridges to be eliminated before moisture appears in the partitions or the building’s operating costs increase. As a result, eliminating thermal bridges is much easier and less expensive than repairing damage caused by their long-term presence.
Before completing the work, it is a good idea to check whether the thermal insulation is continuous at the junction of the roof and exterior walls, whether the areas around the wall plate have been thoroughly insulated, and whether any gaps have been left around the roof windows. Chimneys, utility penetrations through the roof, the eaves, and all areas where the insulation is cut through by structural or installation elements also require special attention. It is also important to check the integrity of the vapor barrier on the interior side, as leaks can lead to moisture penetration into the roof layers.
Thermal bridges around the roof are a common cause of reduced energy efficiency in buildings. They most often occur where the roof meets the exterior walls, at the eaves, around roof windows, chimneys, utility penetrations, and in the eave area. They are primarily caused by construction errors, breaks in the continuity of the insulation, improper fitting of the insulation material, and a lack of airtight joints.
The most effective way to reduce heat loss is to ensure that insulation is installed properly during the construction phase. A continuous layer of insulation, proper assembly of roof windows with thermal breaks, a tight vapor barrier, and quality control of the work help reduce the risk of localized cooling of building partitions, moisture buildup, and mold growth. As a result, the roof maintains better thermal performance, and the building is more comfortable and less expensive to operate.
The most common locations for thermal bridges are where the wall meets the roof slope, around the wall plate, near roof windows, chimneys, utility penetrations through the roof, and the eaves area. These are areas where thermal insulation can easily be disrupted or gaps can form.
The presence of thermal bridges may be indicated by cold spots on walls, slopes, or jambs; moisture; signs of water vapor condensation; mold; and higher heating bills. The most accurate diagnostic method is an inspection using a thermal imaging camera during the heating season.
A thermal imaging inspection is best performed during the heating season, when there is a clear temperature difference between the interior of the building and the outside air. This makes it easier to locate areas of increased heat loss and assess the quality of the insulation installation.
Yes. In areas where thermal bridges are present, the surface temperature of the partition is lower than in other parts of the building. This can lead to water vapor condensation, moisture in the finish, and, over time, the growth of mold and fungi.
The key is to ensure continuity of the insulation between the exterior walls and the roof surface. Special attention should be paid to the roof plate, roof windows, chimneys, eaves, and all roof penetrations. It is important to cut the insulation material precisely, ensure tight joints, and install a properly executed vapor barrier on the interior side.

Yes, the roof can visually alter the proportions of a house—and often does so more significantly […]
Read moreCondensation under a metal roof is a phenomenon that should not be overlooked. Water vapor condensation […]
Read moreUntil recently, a “cube house” from the communist era was associated with architectural mediocrity. Today, it […]
Read more